
 This guide will help show you how to easily add Android Studio’s NDK to your previous projects. Specifically, it will show you the bare bones setup of the NDK, and get you writing native methods as quick as possible. This guide assumes you know your way around Android Studio.
For a deeper explanation of the process, read here: https://developer.android.com/studio/projects/add-native-code.html
Versions used in the guide:
- Android Studio 2.3
- NDK 14.0.3770861
- CMake 3.4.1
- LLDB 2.3
Downloading The NDK
Unfortunately, this step will probably be the longest, unless you have already downloaded the NDK. Also a quick tip, be sure to occasionally check the download progress, as you may need handle an unexpected dialog. Nothing is like coming back to your computer 5 hours later, and finding the download has halted because it is waiting for you to answer a question.
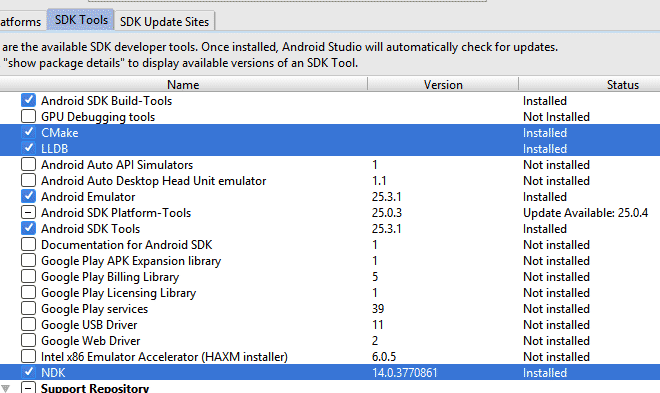
So to start, open Android Studio then open the SDK Manager (Tools > Android > SDK Manager).

Open the SDK Tools tab, then check CMake, LLDB, and NDK, and hit apply.
Configuring An Old Project
Once downloaded, the fastest way to configure a NDK project would be to create a new project and include native support from the setup wizard. However, if you have an older project and want to use it instead, configuration is still fairly simple.
Create a Native Library
To make a native library Navigate to Project > app > src > main and create a directory called “cpp”. After, create a new file called “native-lib.cpp” and place it in the “cpp” directory. Just to note, you can name the file anything you want, but for the sake of this guide it’s best to use the same name.
Create a CMake File
CMake is the tool that builds your native library, and needs a Cmake build script. To make the build script, navigate to the Project > app directory and create a text file called “CMakeLists.txt”. Add the following code to the file:
cmake_minimum_required(VERSION 3.4.1)
add_library(native-lib SHARED src/main/cpp/native-lib.cpp)
find_library(log-lib log)
target_link_libraries(native-lib ${log-lib})
Link Gradle With Your Native Library
Open the module level Gradle build file located in Project > app > build.gradle, then add the code below, and re-sync.
android {
    externalNativeBuild {
        cmake {
            path "CMakeLists.txt"
        }
    }
}
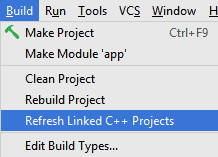
Then execute Build > Refresh Linked C++ Projects.
Writing Native Methods
Now for the fun part, actually writing some code! Don’t get too excited just yet because native methods for Android are a bit trickier than in Java, and much less convenient. Hooray!
First, any Java class that accesses a native function needs to include that library. Add the following to your Java class:
static {
    System.loadLibrary("native-lib");
}
Also, you must declare the native function prototypes, which are any functions you want to call from within your Java class. Add the following to your Java class:
public native void copyFile(String input, String output);
Now you are ready to interact with native code, and can call the function just as you would in Java. For this function, the Java code would look something like this:
public class ExampleClass(){

    static {
        System.loadLibrary("native-lib");
    }

    //Native prototype - Copies the contents of one file to the other.
    public native void copyFile(String input, String output);

    public void exampleFunction(){
        File input = new File("FILEPATH");
        File output = new File("FILEPATH");
        copyFile(input.getPath(),output.getPath());
    }
}
Here is the native code for the function shown above. Go to your .cpp file and add the following to it:
#include <jni.h>
#include <sys/sendfile.h>  // sendfile
#include <fcntl.h>         // open
#include <sys/stat.h>      // fstat


extern "C" void Java_com_example_myapp_activities_MainActivity_copyFile(JNIEnv *env, jobject obj, jstring input, jstring output){

    const char *i = env->GetStringUTFChars(input,false);
    const char *o = env->GetStringUTFChars(output,false);

    int src = open(i, O_RDONLY, 0);
    int dst = open(o, O_WRONLY | O_CREAT | O_TRUNC, 0644);

    struct stat stat_source;
    fstat(src, &stat_source);

    sendfile(dst, src, 0, stat_source.st_size);

    close(src);
    close(dst);
}
You’ll notice that the function name in the example is very long, which is required for your Java class to access it. Not all functions need to be like that, but it does for the ones that Java accesses. Basically the structure for most functions are as follows:
extern "C" {RETURN_TYPE} Java_{PACKAGE_NAME}_{CLASS}_{FUNCTION_NAME}(JNIEnv *env, jobject obj){}
Keep in mind, only the class specified can get access to the function, so it is probably best to create a reusable Java class that handles all native functions to keep from having repeat code.
I am trying to do this but this is not working. What i do now ?
What part are you having trouble with?
به یک استدیو ضبت صدا خوب نیازدارم